Landing pages
MailUp offers a tool to create and manage landing pages, which can be inserted into your emails as special links.
Features
- Fully responsive landing pages editable with the drag-and-drop editor, without any HTML knowledge
- Pages are hosted by MailUp and accelerated via the content delivery network used by the platform.
- Easily add Web analytics tracking code (e.g. Google Analytics or Pixel Facebook) to track landing page usage.
- Add subscription forms to collect new subscribers.
- Add a video as background to the contents of the landing page that will automatically be played. When you add or select a content row, you can enable this option from the sidebar of the drag and drop editor and insert the URL of your video you want to upload.
Creating a landing page
First, go to Messages > Email > Landing pages.
- Create a new landing page, by clicking the "New landing page" tab or the "New" button in the lower right.
- Choose a template from the ones available
- Edit the page with the drag-and-drop editor and, when you're done, click "Save landing page"
On the "Settings" page, you can:
- publish the landing page (thus making it public)
- add "Title" and "Description" meta tags, to enhance page SEO
- add a web analytics tracking code (e.g. Google Analytics or Pixel Facebook) or JavaScript code in <head> tag.
Use Additional Groups to create a group containing all users who have completed a form; you can use this group to activate targeted campaigns, e.g. by sending a thank you email containing a discount code.
It is only possible to add as additional groups the groups of the list in which you are adding the form.
How to add a subscription form to your landing page
The landing pages created with the drag-and-drop editor can contain a subscription form, so as to become a tool for acquiring new subscribers, like the Subscription forms.
Once you have created your landing page, inside the editor, drag the "Form" content into the body of the landing page.
Once you've entered the form, use the Content Properties menu on the right to edit and add your form fields.
From here you can:
- Delete or modify one of the fields inserted by default
- Change the field label (eg "Name" to "What's your name?")
- Drag a field up or down
- Add a new master field by selecting "Add new field"
Select the field you want to insert and then click on edit to change the label (i.e. the name that appears above the field), the type of content, the placeholder (a description to facilitate filling in), whether the field is compulsory, and/or read-only.
You can insert only subscription forms on the landing pages, that is, to acquire new subscribers. If you want to update the information of your recipients, we recommend that you use the profile update forms.
Form protection with invisible captcha
The captcha is a form security measure that protects the form from abuse, users from spam and keeps your database clean with only real contacts.
In most cases, the control takes place invisibly to the visitor because the tool interprets whether the interaction with the page is by a person rather than an automatic bot. Only in case of suspicious activity, the captcha administers a simple test to understand if the person filling out the form is a human.
Options available depending on the active subscription
Sending customized Subscription confirmation email
The compilation of a registration form provides - by default - the sending of the registration confirmation email in which the new recipient has to confirm. This process reduces the risk of the form being abused and the acquired contacts database damaged. To retrieve the email that is sent, go to the section Subscriptions > Confirmation request email.
Depending on the active subscription, you can:
- choose a different email for each landing page with subscription form;
- decide not to send the confirmation request message and register the contact directly when filling out the form.
Customized Welcome email
The welcome email is a message that you can send to all recipients as soon as they sign up. You can activate the automation and set the email to be sent in the Subscriptions > Welcome email
Depending on the active subscription, you can:
- decide to send a different email for each landing page with subscription form
- decide not to send the welcome message for that single landing page
Customized post-signup pages
After filling out a registration form, users see a page with the result of the registration ("Thank you for your registration! You will soon receive our newsletters." Or "Attention, your email was already subscribed to our newsletter", etc.). This page can be customized or replaced with dedicated landing pages (created in MailUp or hosted on your site).
Depending on the active subscription, each landing page with subscription forms can be customized with dedicated post-subscription pages.
How to measure the effectiveness of the landing page?
Once your Landing page has been created and published, you can monitor how many contacts you are acquiring and see the details of their status.
In the list of Landing pages created (Database building> Landing pages) you will find the "Contacts Acquired" column which contains the following items:
- Email subscribers
- Pending emails
- SMS subscribers
By clicking on the number, you can access the Recipients section to see the details. If your Landing page does not contain any Subscription form, then "No subscription form inserted" will be displayed.
How to use landing pages that contain a subscription form?
- On-site: refer to the landing page to collect new subscribers on your site.
- On social channels:
- share the link to your landing page to get new recipients.
- use it as a landing page for Facebook's "Add a Subscribe Button" feature
- to collect new subscribers with your adv campaigns.
Create a landing page from an email
To create a landing page starting from an existing message, go to the message overview. Click on the drop-down menu next to the "Edit" button and then on "Create landing page". This feature is only available for messages created with the BEE editor.
Removing special links and dynamic content
After you have created a landing page from a BEE message, remember to edit it and delete email-channel related special links (discard, profile manager, web version ...), plus any dynamic content.
Why link a landing page in an email?
Landing pages are a great companion to short, visually impactful emails with a clear call to action. This kind of emails tends to perform better.
Beyond that, the use of a landing page allows avoiding email clients limitations, like clipping of long messages in Gmail and Yahoo or missing compatibility with HTML5 (for example, you can embed a video using HTML5's video tag)
How to link a landing page inside an email
Once you've created a landing page, you can easily link it in an email:
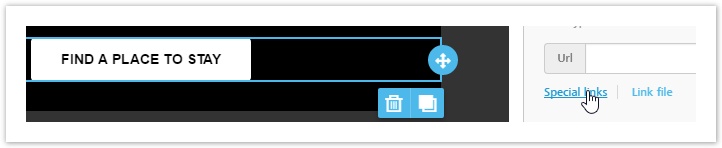
- If you're using BEE, select a button and choose "Special links" in the "Action" section of the "Content properties"
If you want to link a text portion instead, just select it, click on the arrow in the upper right of the text toolbar to open advanced tools and select Special links > Landing pages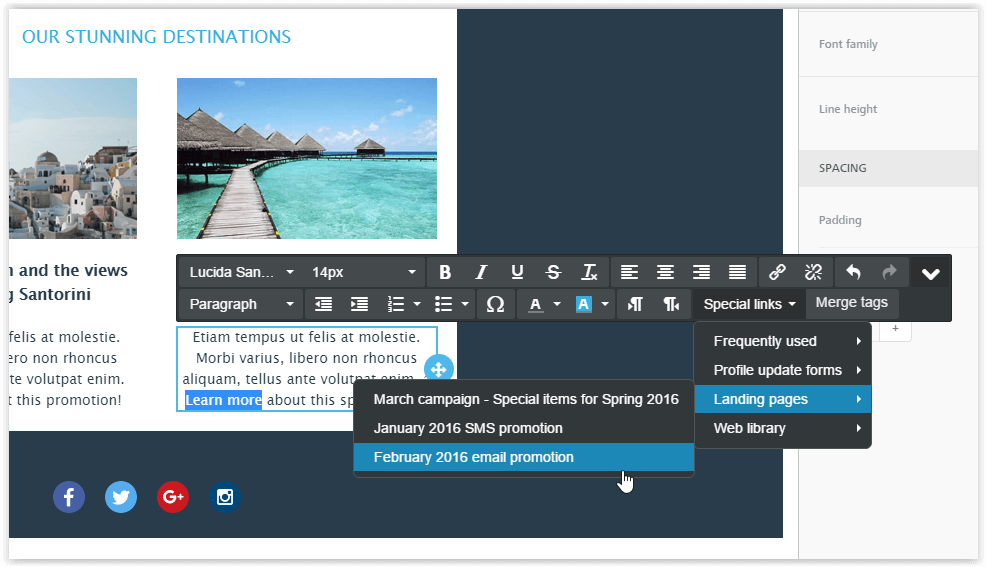
- If you're using the HTML editor, link any part of the message to a landing page using the "Landing page" button available in Home > Links section
Creating an email from a landing page
From Pages > Landing pages, click on the Actions button of a page and select "Create email" to create an email message, editable with the BEE editor, identical to the landing page.