Creating Email messages
Prepare your email message
To create an email message, select Message> Email and click on "NEW EMAIL"
There are numerous ways to create a new email message:
- New, start from scratch and create your email
- From template, choose a preloaded template
- From file, upload your HTML file
- From URL, retrieve text from a webpage
- From RSS feed, setup your email to retrieve content through RSS feeds
- From BEE, the drag&drop editor
Create from BEE
BEE is a drag-&-drop email editor. With BEE you will be able to work on the content of your email messages without having to worry at all about the underlying HTML. And you will do this in a completely new and highly simplified user interface that's fun and easy to use. In BEE, messages are built with content blocks that can be dragged and dropped wherever you want them. Internal tests have shown that you can create a new email message in as little as a minute and a half!
Chek more details here.
Create from HTML
MailUp has a new drag and drop editor that allows you to create messages quickly and easily. it's called Bee.
- When you create a message with Bee, you do not have access to the HTML.
- With the WYSIWYG editor, you cannot drag-and-drop content into the message, but you can access the HTML.
- You can start a message with Bee and then further edit it with the WYSIWYG editor if you need to edit the underlying HTML
In the WYSIWYG editor, all related tools are grouped together and easy to reach: use the tabs on top of the ribbon to pick what you need.
Use the HTML button in the bottom left to view and edit the HTML source code

Best Practices for creating a successful email message
Once you are ready to send the message:
- Always send the message to a Test group first. Unless you do so, it's impossible for you to verify that tracked links and the unsubscribe to link work. (A default group is set up in the groups list marked TEST.)
- Insert an automatic unsubscribe link into any e-mail message by using the "Uns" button in the HTML editor (New From File). The system will add a [http://[unsubscribe]/|http://unsubscribe/] link to the which will be dynamically activated during the delivery of the message.
- Automated Tracking: You can also track all links that exist in your message by clicking the Advanced button on the HTML Editor page. Technically speaking, the string "[track]" is added to the URL. So http://www.myWebSite.com would become http://\[track\]www.myWebSite.com – As mentioned above, these links will not work in the message preview window, because of the "[track]" string. They will work only as a received message. So always add your own email to a test group and send the message to that test group to verify that all links in the message work properly before you send the message to an active recipient group.
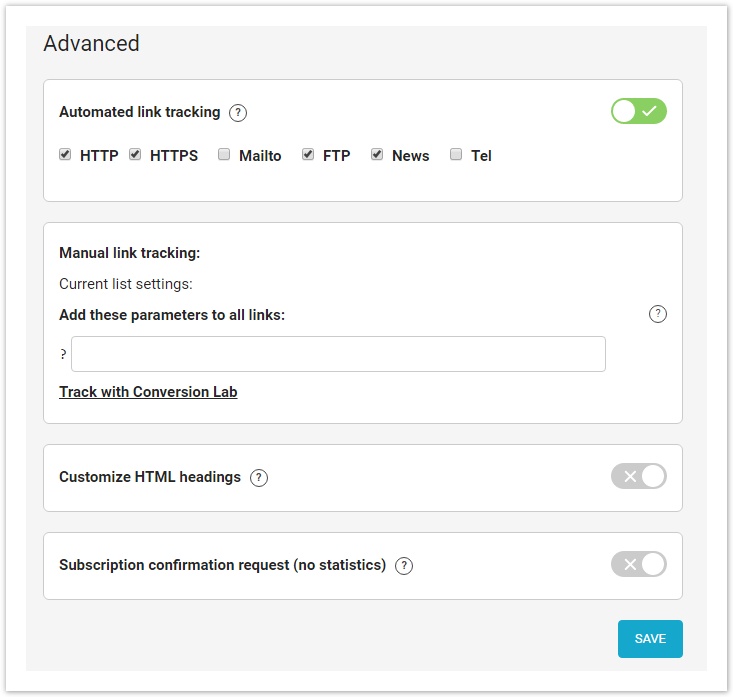
- Manual Tracking: If you are using the built-in HTML editor, you can manually add a link using the Insert Link feature in the HTML editor toolbar, and turning off the "Automated Link Tracking". To track the link, click on "Track This Link" in the pop-up window where the link is setup.
- Double check the content of your message in order to avoid it being classified as spam (e.g.: you certainly don't want to add words typically used in SPAM messages in the Subject field). There is a lot of information on the Internet on how to avoid writing messages that end up being considered SPAM.
- By default, your messages will include a header and a footer. You can find the contents of the default Header and Footer by clicking on the Header and Footer buttons on the Html setup page. We recommend that:
- You leave the header as is. It's a simple link to a Web page that displays the same email content in a browser in case the recipient cannot properly view it in his/her email.
- You add your address and contact information to the footer and leave the rest as is. Many countries' consumer privacy regulations require that you include your contact information in your email messages.
- You can add Dynamic Fields (e.g. a customer's name) to the message by clicking the Dyn. Fields button. When the option is turned on, the system will automatically replace the tags you add to your message with the corresponding values. A list of tags is displayed at the bottom. For example, Dear [first name] [last name] could be used.
- Use Email Check-up. This is the icon presented at the toolbar in Saved Email Messages. E-Mail Check-up takes you through a checklist of items to ensure your email message is received properly.
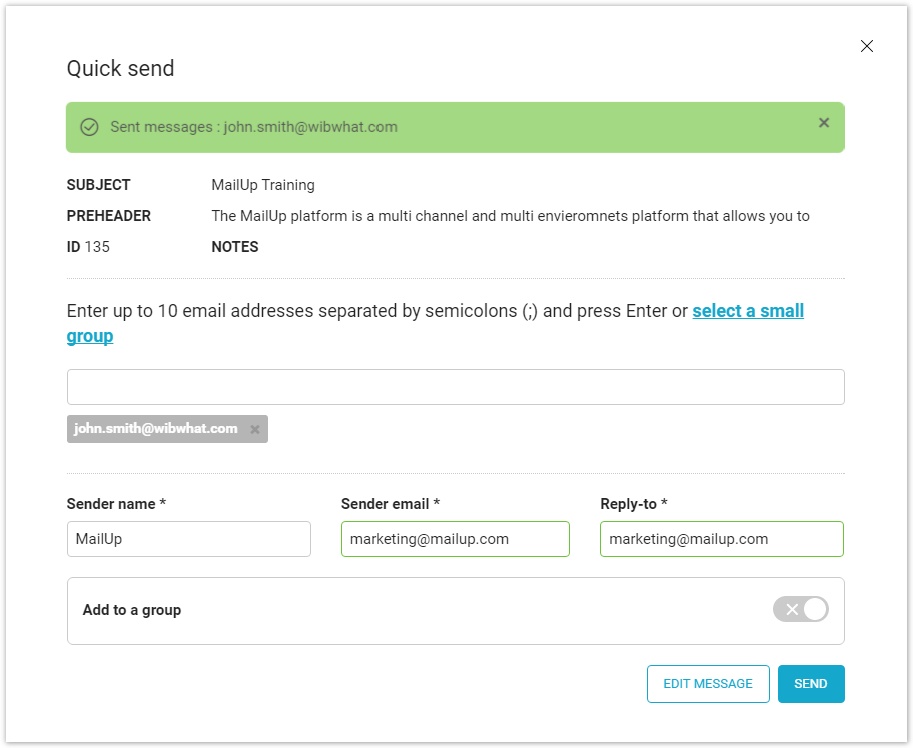
- Do a quick test by using the Quick Send feature. It allows you to quickly add up to 10 different email address to which you can instantly send the message that you just worked on in order to see how it looks, test that the links take the recipient where they should, etc.
Go to New Email Message in the User Guide for step by step instructions on how to create an email message.