Use in Email Clients and Web Apps
Outlook
You can use SMTP+ as your outgoing mail server in Outlook. Here is how to do so.
- Create a SMTP+ user in your MailUp admin console
- Start Outlook and select File > Account Settings
- Select the account that you wish to edit and click on Change
- On the window that is shown to you, enter your SMTP+ server address as the Outgoing Mail Server (e.g. in.smtpok.com).
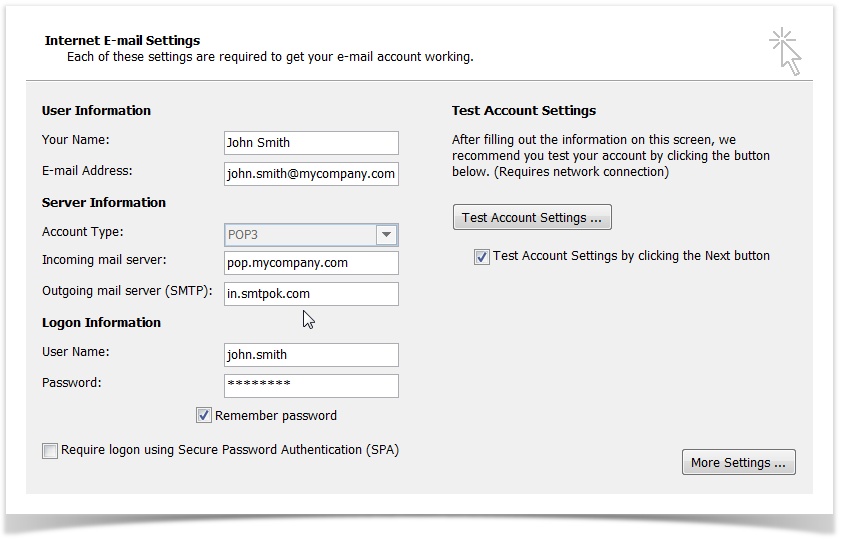
- Click on More Settings to configure the rest of the settings needed to use SMTP+ as your outgoing mail server
- In the Outgoing Server tab:
- Check the checkbox "My outgoing server (SMTP) requires authentication"
- Select "Log on using"
- Enter your SMTP+ user name and passwords (which you obtained when you added the SMTP+ user in your MailUp admin console)
- Click on "Remember password"
- In the Advanced tab, change the Outgoing server (SMTP): to use a port supported by SMTP+. You can use port 25, which is often the default one for outgoing mail and is supported by SMTP+. In some cases (i.e. with some Web hosting companies) port 25 is disabled. In that scenario, choose another port supported by SMTP+, such as port 2525. A list of supported ports is available under SMTP+ settings.
- Click on OK to save the settings
- Click on Next to save the new outgoing mail server configurations to this Outlook email account.
You are done!
WordPress
There are many WordPress plugins that allow you to use an external SMTP server. For a list, see: http://wordpress.org/extend/plugins/search.php?q=smtp
For example, you could choose WP Mail SMTP: http://wordpress.org/extend/plugins/wp-mail-smtp/
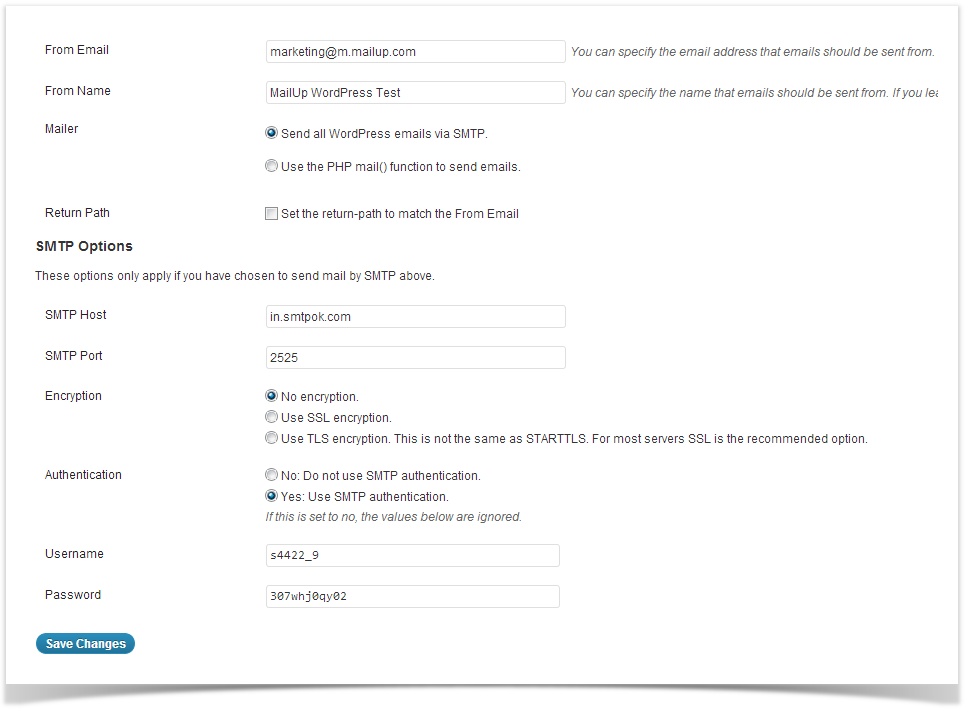
Once you've installed the plugin, create a SMTP+ user and enter those credentials in the plugin settings.
Please note:
- From email: make sure that you are using a FROM email that has been authorized in your SMTP+ settings
- From name: you can use any name
- Mailer: select "Send all WordPress email via SMTP"
- Return Path: leave unchecked
- SMTP Host: enter the host provided to you when you created your SMTP+ user
- SMTP port: you can use a variety of ports. Since port 25 (the default one) is sometimes blocked by Web hosting providers, try a different port, such as 2525
- Encryption: set to No.
- Authetication: set to Yes and enter your SMTP+ user credentials
Your custom application
See: Using SMTP relay from your application
Related articles
- SMTP+ overview
- Set the properties for the messages sent using the SMTP+ feature
- Configuring SMTP+, server and users
- Set and customize the notifications sent by the SMTP+ feature to your users
- View the send status of SMTP+ messages
- Using SMTP relay from your application