This area of the "Preferences" section is divided in its turn into 5 sub-areas This "Preferences" area is divided into 5 sub-sections that allow to completely customize your messages:
| Table of Contents |
|---|
Categorization
Our .
If you wish to delete a list or to create a new one, you can do so from Settings > Account settings > Lists. In Settings > Advanced settings > User permissions you can decide which user can access to selected lists.
| Table of Contents |
|---|
General
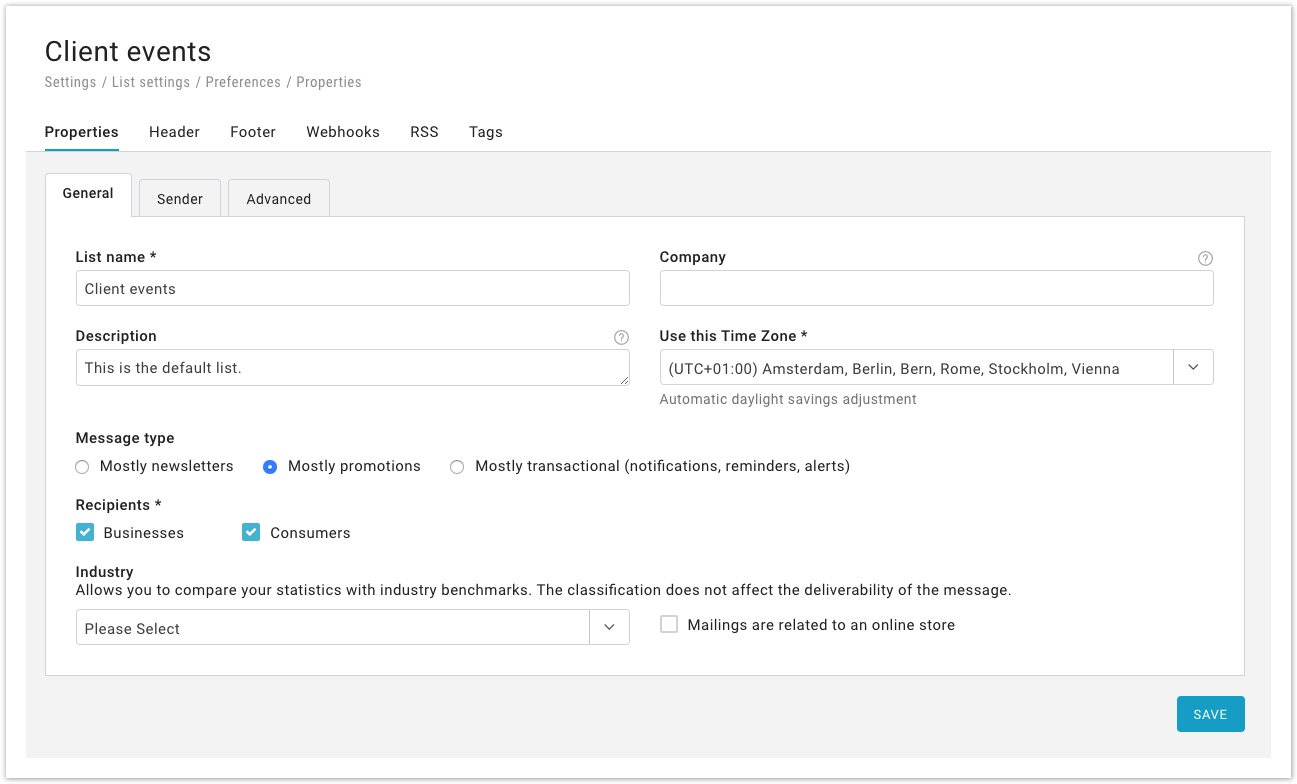
In this tab, you will find some general settings.
- List name
- Company
- Description: this is an internal note, useful to better identify a list inside the account.
- Time Zone: choose a time zone to use as reference for the list.
Furthermore, our system gives you the chance to compare your mailings to those of other companies in the same industry that use our system.
In order to allow the system to do that, you have to fill out these fields correctly:
- Message type: select here which type of messages you are sending from this list: newsletters, direct marketing messages, or transactional messages (i.e. alerts, reminders, notifications)
- Recipients: select if your mailing is directed to businesses or to consumers
- Industry: select from the dropdown drop-down menu the industry your company belongs to, for the benchmark analysis to be effective.
...
Parameters you can modify here:
- Email sender From name: the person or entity that is sending the message. It could simply be your company name.
- "FROM" From email: the email address that is sending the message. Make sure that it is a recognizable address (e.g. it uses your Web site domain)
- Header sender: enter an email address here if you want your message to be sent on behalf of that address.
- Reply-to: If your newsletter asks for a reply from the recipients, you may want the replies to be sent to a different address from the "FROM" email. Enter the reply-to address here: it must be a valid email address. If you leave the field blank, the "FROM" address will be used.
- SMS sender name: the person or entity that is sending the text message. It could simply be your company name.
Subscription
A section in the admin console that allows you to enable/disable some automated messages:
- Email subscription confirmation message: the system sends an email message each time a recipient confirms the subscription. The link provided will lead you to Notifications > Welcome email, where you will be able to modify it using the built-in editor;
- SMS subscription confirmation message: the system sends a text message each time a recipient confirms the subscription. The link provided will lead you to Notifications > Welcome SMS, where you will be able to modify the message sender number and body..
- Subscription confirmation request message: a message sent to new recipients to confirm their intent to subscribe.
Send latest newsletter to new subscribers
Allows users to send the latest newsletter to new subscribers can help them be more successful email marketers as those messages will receive more opens and clicks.
Configurable settings for message selection
To automatically select the message to be sent (i.e. the latest newsletter), users will be able to set the following settings:
- Only messages sent in the last (days) ___ (default value: 20)
- Only messages sent to at least the following % of recipients ___ (default = 50)
- Only messages that have been tagged with the following tag(s)
- Show tag search-selection combo box
- Allow more than one tag
- If more than one tag is selected, use the boolean OR operator when querying messages
Notes:
- At least one of the 3 selections must be made when the feature is ON.
- Fields (1) and (2) only accept integers
- (3) should only show tags that are being used (i.e. tags that have been assigned to at least 1 message)

Unsubscription
You can choose among several methods of unsubscription - let's see them in detail:
...
- Make sure your messages contain an unsubscribe link. The best way to go is to include one in the footer that is used for every message sent (Settings > List settings > Preferences > Footer).
- Make sure that the link is clearly marked as the unsubscribe link as customers that click on it will be instantly unsubscribed. There is no additional step for the customer to take (the customer will not need to confirm the intention to unsubscribe).
...
- Make sure your messages contain an unsubscribe link. The best way to go is to include one in the footer that is used for every message sent (Settings > List settings > Preferences > Footer).
- To configure the page that will be shown when they click on the unsubscribe link, click on the "Update" button far to the right of the screen. Make sure that the page includes a sentence that allows them to complete the unsubscribe process. For example: "To confirm your intention to unsubscribe, please click here".
- Highlight the word(s) that you want to turn into the unsubscribe link and click on the UNS button in the HTML editor toolbar (in the case of the message above, you would highlight the words "click here").
- When customers click on that link, they will be unsubscribed.
Advanced options
...
Email footer
In compliance with the Can-Spam Act of the USA and other international anti-spam laws, MailUp asks its customers to include sender information in each message sent. The information entered here will be automatically placed in email footers.
- Sender company *
- Sender contact name *
- Sender address *
- Sender city *
- Sender state
- Sender postal code
- Sender country *
- Sender phone
- Sender website * (without http://)
- Permission reminder (where sender reminds recipients of why they are receiving messages)
* marks mandatory fields
Advanced options
This area is divided into three kinds of advanced options.
General Options
- Enable hosted subscription forms: allows you to use the ready-made, customizable subscription forms.
- Display as: set here the name that will be displayed in the "To" section of the email message heading. You can choose up to 3 personal data fields from the dropdown columns.
| Note | ||
|---|---|---|
| ||
List 1, created on your first login in MailUp, has a "Display as" option default value, which is a combination of ID 1 field and ID 2 field. These two fields by default correspond to First Name and Last Name. If you modify these two fields, we suggest you check the "Display as" setting and eventually change it to match your preference. |
- Table headings when listing recipients: set which columns will be displayed in Recipients > Channel when recipients are listed after a search.
Email Options
- Email size alert: You can set a message size limit, beyond which the system will alert you.
- Enable web library: By turning this feature ON, you enable the Web library, so that you can select from your saved emails section which emails to publish. View how to publish emails under Email > Saved.
- Tracking: enables message tracking by the system.
- Make sure that link tracking is ON if you wish to track clicks in the messages you send.
- Link tracking parameters: insert link tracking parameters to be added to every link in every message you send through MailUp. They must be added without the leading question mark. For example, this feature allows you to add parameters that a system like Google Analytics will use to detect that traffic to a Web page came from your email campaigns. Since these links are added to every link, here you will add "generic" parameters, such as the source (the "utm_source" parameter in Google Analytics: e.g. "newsletter") and the medium (the "utm_medium" parameter in Google Analytics: e.g. "email"), but not campaign specific parameters. You can then add additional parameters at the message level, when creating or editing a message, such as a campaign identifier for a specific campaign (the "utm_campaign" parameter in Google AnayticsAnalytics: e.g. "julyPromo").

For more information on Google Analytics campaign tracking in MailUp, please see:- MailUp blog: Google Analytics campaign tracking in MailUp
- How can I track whether an email campaign triggered sign-ups, purchases, page visits, or other activity that follows a click on a link?
- Tracking campaign results with Google Analytics (or any other Web analytics application)
- Charset: Choose the charset that will be used in your campaigns
- Content type: Select whether to create your messages in HTML language or just a text version. Note that text-only versions do not allow tracking of opens and clicks.
- Multipart option: creates a text-only version of the message that will be viewed by recipients whose systems do not support HTML or use the text-only version by default. Check the box to enable the option.
- Unsubscribe confirmation message: Each time a user unsubscribes, the system will send him a confirmation message, to inform that the unsubscription was successful.
- Envelope-sender (return-path): the email address that will receive bounced addresses.
- Header sender: enter an email address here if you want your message to be sent on behalf of that address.
- X-Abuse
- List Unsubscribe
SMS Option
- Default country code: set here the default country code that will be used by the system.
- SMS do not disturb time: the system can be configured in order not to send text messages at certain times of the day , when you think they might be disturb the recipients. Click on "Edit" to enable the feature and configuring the setup: you can choose whether to create the "do not disturb" area every day or on a certain time frame, the start and end times , and whether to restart sending at the end of it.
Google translate
If you turn this setting on, you will be able to add a "Google Translate" button inside the unsubscription and "Send to a friend" pages.