The MailUp newsletter signup plugin for WordPress is available free of charge in the WordPress Plugin directory.
The plugin is compatible with the latest version of Wordpress.
Introducing the MailUp Plugin for WordPress
The MailUp plugin for WordPress makes it easy to add a customizable newsletter signup form to a WordPress Web site. With the MailUp plugin you can easily add a newsletter sign-up form to your Web site or blog, and then send and track email and sms with MailUp. The MailUp newsletter signup plugin for WordPress is available free of charge in the WordPress Plugin directory.
- Visitors to your WordPress-powered blog or Web site will be able to subscribe to your newsletter using a configurable sign-up form. Their information will be saved in your MailUp account.
- You will use your MailUp platform to manage those subscribers, create and send messages to them, view statistics on sent messages, and more.
- The MailUp plugin supports the recommended 'confirmed opt-in' subscription method (i.e. subscriber receives an email with a confirmation link that has to be clicked to confirm the subscription). This method ensures that spam traps or wrong email addresses are never added to your list.
- The unsubscription process will be managed automatically by MailUp (e.g. unsubscribe link in the footer of your messages).
- MailUp supports SMS (text messaging) too, so you can choose to collect a mobile phone number as well.
How to use it
MailUp and WordPress make it easy to create a Web site and a blog, and to communicate with readers or site visitors through a newsletter.
- Signup for a free trial (no credit card required): English / Italiano
- Create one or more Lists (e.g. two WordPress sites: you will create two Lists in MailUp).
- Install the plugin in your WordPress admin area, as described below
- Configure settings such as the header, footer, message templates, confirmation request email, welcome message, etc.
- Visitors to your Web site will start signing up, and you will be able to track the subscription trend over time in your MailUp admin console.
- Create and send email and/or text (SMS) messages to your subscribers.
- Use the NEW MESSAGE FROM RSS feature to create a newsletter from RSS feeds (a list of recent articles from your WordPress-powered blog). Just select the posts and choose a template and priority. You will be able to edit the newsletter after it has been automatically created, before you send it, without any copying and pasting.
- MailUp automatically manages the unsubscribe process and gives you access to statistics down to the individual recipient level (opens, clicks, social sharing, etc.)
Installing the MailUp Plugin for WordPress
See the video tutorial above for an overview. Here are detailed instructions:
Sign-in to your WordPress admin account from your website or blog.
View the Plugins tab and Click on “Add New.”
Search for the "MailUp" plugin on the search tab
Click on “install now.” and click "yes" to confirm.
Click on "Activate plugin."
Go to the the Appearance section and click on the widgets tab. You can see all the available widgets including the MailUp one.
Drag the MailUp widget into the main sidebar.
You can now go to your website and check that the MailUp newsletter plugin is installed.
Configuring the plugin
Authorizing WordPress to communicate with MailUp
Before you can connect your WordPress site to your MailUp account by filling out the fields on the setup page, you will need to activate the MailUp API in your MailUp account:
- Log into your MailUp account
- Navigate to Settings > Account settings > Developer's corner > Web services
- Select Frontend from the drop-down
- Check the Enabled checkbox
- For added security, enable IP Address Validation and add the IP address of your Web site
Locating the IP address of your Web site
To find out the IP address of your Web site, you can use a service such as https://www.site24x7.com/find-ip-address-of-web-site.html
Potential issue with IP address validation
Connecting WordPress to MailUp
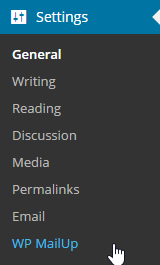
After installing the plugin and authorizing an external connection to your MailUp account, access the WordPress administration panel and select Settings > WP MailUp in the left-side navigation menu to configure the plugin.
The setup page will be displayed.
Continue with the steps below, starting with adding your MailUp account credentials to the General Settings tab

Configure the settings in each section as described below. Please note that all the data required to configure the plugin is available in your MailUp console under "Settings > Codes Table".
Use this section to configure general properties, including the MailUp account URL, form title, etc.
Setting | Description | Default Value | Example |
MailUp Console host | MailUp console URL |
| abcd.sp09.it
|
Subscribe path | Subscription page name and path (do not modify this entry) | /frontend/xmlSubscribe.aspx |
|
Plugin Title | Subscription form title shown where the widget is placed |
| "Sign up for our newsletter!" |
Description | Text shown under the title |
| “Enter your information and press Sign Up” |
Submit Button | Text used for the submit button |
| "Sign Up" |
Select preloaded CSS for widget | Select one of four predefined styles. [1] | ||
| Use placeholders instead of labels | If checked, placeholders inside recipient fields will be used to display the names of the fields | ||
| Request confirmation by email | Asks new subscribers to confirm their subscription via email (recommended) | Checked |
|
| I am using WPML to translate this website | Check this option if your Wordpress site uses WPML or Polylang for multilanguage support. |

[1] You can change the style of the sign up form as shown here.
The last option is useful if your Wordpress site uses WPML or Polylang for multilanguage support. By checking this box, each text string configured in the MailUp plugin will be added to the Wordpress strings DB shared by all plugins. The translation plugins will retrieve the strings from this DB and allow to translate them, so that language selection made by the user at site level will also be reflected in the subscription form configured with MailUp's Wordpress Plugin.
Recipient list
Select which List in your MailUp account the new subscriber will be added to. MailUp accounts support multiple lists, but you can only add site visitors to one List (and optionally one Group within the List) using this widget.
Field | Description |
List ID (REQUIRED) | Numeric list identifier. You can locate the ID in your MailUp console under "Settings > Codes Table". |
List displayed name (NOT REQUIRED) | Not currently in use |
Group ID (NOT REQUIRED) | Numeric Group identifier within the list. You can locate the IDs in your MailUp console under "Settings > Codes Table". |
Personal Data Fields
The subscription form can pass up to eight separate pieces of information to MailUp. Either the email or the mobile phone number must be sent to MailUp for the user to be added to the system, so you must make at least one of those two fields required. The other six fields can be associated with any of the additional fields used in your MailUp console under "Manage > Personal Data Fields". Please note that one of this six additional fields is a date picker, so this particular field can only be used to send a date (in US format, mm/dd/yyyy).
- Check "Show" to show the field in the widget
- Check "Req." to make the field required
- The field code must match a valid field code in your MailUp console. "Email" and "sms" should not be altered. The other field codes can be any of the field codes available in your MailUp console, and they can be located under "Settings > Codes Table".
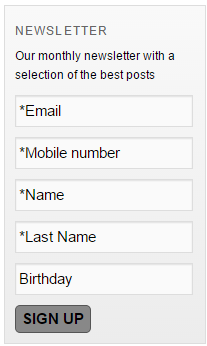
- You can use as few as 1 field and as many as 8 fields. In the example below, 5 fields are used.

Here is how the plugin looks by default on customer-facing pages:
Messages
Here you can edit the error messages that are shown when the submit button is pressed, if there is an issue.
Error type | Example |
Success | “Thank you for subscribing to our newsletter. Check your email to confirm your subscription.” |
Generic error | “There was an issue. Please try again.” |
Invalid address | “The email address is not valid” |
Already present | “It looks like you're already a subscriber!” |
Terms and conditions
You can add up to two conditions the subscriber has to accept in order to subscribe the form. Enabling one or more conditions is optional.
In the widget panel, the submit button requires you select all the enabled conditions to proceed.
In the example below two conditions are enabled, only the for the first one an additional text is provided. Please note that basic HTML can be included in the textarea field to link to an external document
| Admin panel | Frontend widget |
|---|---|
|
|


Test connection
You can use the "Test" button to instantly verify the plugin settings you've configured, so that you are immediately aware if there is an IP addresses restriction configured in MailUp, or if an incorrect IP-based restriction set in MailUp is preventing the plugin to communicate with it.

Customizing the default CSS styles
You can customize the look of the subscription form created by the plugin in your WordPress-powered Web site by either changing the CSS style selected under General Settings as mentioned above, and/or by further editing those cascading style sheets. Familiarity with CSS is required to manually edit the default styles. Here is how to do so:
- First, select the Plugins Editor in the WordPress administration area
- Select “WP-MailUp” from the drop-down menu
- A list of files will be displayed, including 4 CSS documents: “style1.css”, “style2.css”, “style3.css”, “style4.css”. They correspond to the following styles shown in the drop-down menu under General Settings:
- style1.css = Default
- style2.css = Rounded corners
- style3.css = Rounded black
- style4.css = No style
- Select a file to modify it.
- Click on "Update File" to save your modifications. We recommend that you backup the code before making any changes. If you don't see the "Update File" button, you probably don't have sufficient permissions in your WordPress installation. Contact your WordPress site administrator.
The form is identified by the selector “#subscribeForm” in the CSS document.
- Note that the changes are immediately live in your WordPress site, if the document you edited corresponds to the style currently selected under General Settings.
Avoiding CSS conflicts
FAQs and Troubleshooting
Do I have to be a MailUp customer to use the plugin?
You must have activated a MailUp console (full account or a free trial) and then specify the platform URL in plugin settings. On MailUp you must enable requests coming from the server that hosts your WordPress site (go to "Manage->Web service" and then select "frontend" in the dropdown menu to insert the IP address of your server. More than one address could be registered).
How can I configure my plugin?
Go to the admin panel, press "Settings" and then select "WP MailUp". Fill in or check all the fields using the help buttons if something is not clear.
How can I check if my plugin is working?
Just fill in the required fields and press the Test button. If the test is successful, try to subscribe to an address from the form. The specified contact will be added to the MailUp distribution list specified in system settings.
Once the configuration is set up, can I make any changes/updates?
Yes, you can modify any of the sections ("General Data", "User Lists", "User Fields", "Errors" and "Terms and Conditions") and update the information.
How can I change the appearance of the plugin?
You can select between four (4) available styles (CSS), if no one matches your need you can edit one of the existing CSS files (style1.css, ..., style4.css). Please note that editing is allowed only for users who have read/write access to those files.
Can subscribers sign-up for my newsletter through a social account (e.g. Facebook)?
Yes, MailUp provides a simple integration with all the most used social networks. You could insert into your website a simple banner "Click here to subscribe to our newsletter using your Facebook account". This feature is a standard one and you don't need to install any plugin, just activate a MailUp account.
Is it possible to translate this plugin?
Yes, edit each string within the settings panel. No need to edit any file. MailUp supports all the charsets. If you use WMPL or Polylang to manage multilanguage, check the corresponding option inside General Settings.
Why should I use this plugin and not other services, like FeedBurner?
MailUp allows you to take control of subscribers (view, import, edit, delete, export) and of messages (define scheduling, content, and recipients).
Can I disable the plugin?
Yes. Click on the Plugins tab and click on "deactivate."
The plugin was configured correctly, but it still returns a "generic error" when I fill out the subscription form. Why?
The IP address of the Web site or blog is probably not registered in your MailUp console. See above under "64913624". If you are still getting this generic error even after correctly registering the blog or Web site's IP address, please try disabling IP address validation in your MailUp console and try again. There are times when IP address validation does not work properly and it can cause this issue.
Can I insert the form within a single page?
Yes. You have to create the subscription form extrapolate the HTML code and paste it inside WordPress during the creation of an article or page (this depends on the theme used or the website set up).
Is it possible to create a shortcode?
Is there possibility to link Mailup plugin to Elementor forms?
For the moment we do not have a direct plugin for the Elementor component of Wordpress, but through the functions of the Elementor plugin, and by creating the registration form in Mailup, you can add the registration form to your website. First of all you have to load the Html block from Elementor:

Then log into Mailup and create your subscription form. Find the subscription forms directly in the console, in the menu "Database building/Subscriptions/Subscription forms". Once created, the Html code can be obtained and copied and pasted into the html block:

In this way you can have the registration form on your site directly linked to Mailup.