...
...
drop-down Create new:

...
In this page you will be required to insert a few
...
pieces of information:
Campaign name
Type: email
Active: yes
Status
Start and end dates
| Warning |
|---|
Warning |
...
You should not insert any information in |
...
the MailUp section, these will be compiled by the tool itself with the statistics of the sent item. |
...

Add members to your campaign
You will then
...
need to add members to your campaign by clicking on the Manage
...
Members button
...
.
...

You will be able to select your campaign members
...
using Salesforce filters
...
.
| Tip |
|---|
TipYou can also add campaign members from other reports you might be running in Salesforce, at any time |
...
. |
...

After identifying the contacts you want to add to the campaign
...
:
Click on Add with status
...
Set it to Sent
...
You will see these contacts at the bottom of your campaign page in the section Campaign Members:
...

...
Export campaign members
...
to MailUp
Buttons and actions
You can now
...
export your campaign members
...
to your MailUp account by clicking on
...
the MailUp button on the top of your page.
You will find here further buttons enabling you to perform the following actions:
...
Sincronizzare le statistiche
The data will be "pushed" to the List within your MailUp account that you have specified in the Configuration.
Here is a description of the buttons that you will find on this page, and what they do:
Button | Action |
...
Creates a group in MailUp
...
Export members in MailUp
...
Export members to MailUp | Pushes the contacts to MailUp, assigning them to a Group named after the Salesforce campaign The data included in any mapped fields is exported to MailUp. Contacts are pushed in batches of 700 recipients, details are available in Recipients > Import > Import status |
Import statistics in Salesforce |
...
Accedere direttamente alla piattaforma
...
Go to MailUp
...
Creare nuovi messaggi partendo dai modelli di MailUp
...
Create message from template
...
Creare un messaggio partendo da un’email vuota
...
Create empty message
...
Vedere il messaggio completo e pronto da inviare ai destinatari
...
Refresh message preview
...
Vedere un report riassuntivo degli invii effettuati (appare solo dopo aver fatto un primo invio)
...
View report
...
Importare i membri in MailUp
Andando ad importare i destinatari in piattaforma, Salesforce creerà un nuovo gruppo all’interno di MailUp in Destinatari > Gruppi denominato con il nome della campagna in cui saranno presenti i destinatari scelti.
Creare nuovi messaggi partendo dai modelli di MailUp
A questo punto siamo pronti per andare a creare un nuovo messaggio partendo da un modello, selezionandolo semplicemente tra quelli che vengono mostrati nella pagina e cliccando Create message.
Il modello selezionato sarà stato automaticamente inserito nell’elenco delle email create della nostra piattaforma in Messaggi > Email > Elenco, con oggetto quello della nostra campagna e nelle note le informazioni relative all’ID della campagna e il momento in cui è stato cerato il messaggio.
Vedere il messaggio completo e pronto da inviare ai destinatari
Possiamo tramite piattaforma andare a modificare in ogni momento il nostro messaggio sia nell’oggetto che nei contenuti. Le modifiche che effettuiamo sul messaggio in piattaforma vengono automaticamente riportate in Salesforce e possono essere viste sia con cliccando sul pulsante Refresh message preview, sia semplicemente ricaricando la pagina web.
Inviare il messaggio da MailUp
A questo punto posso andare, sempre all’interno della piattaforma MailUp, ad inviare il mio messaggio al gruppo relativo.
Attenzione: verificate sempre di aver modificato l’oggetto del messaggio prima di inviarlo, mentre vi consigliamo di mantenere le note come sono per poter tenere traccia della campagna da cui è stato creato.
Vedere un report riassuntivo degli invii effettuati
Una volta inviata l’email, sarà possibile vedere un report riassuntivo dell’invio direttamente dalla pagina MailUp in Salesforce cliccando su View report.
Sincronizzare le statistiche
Dopo qualche giorno dall’invio (per avere dati più completi) puoi sincronizzare le statistiche di MailUp con la campagna di Salesforce, cliccando su visualizzare le statistiche relative all’invio Import statistics in Salesforce e queste appariranno all’interno della pagina generale della campagna di Salesforce.
Le stesse informazioni appariranno anche all’interno di ciascun Campaign member:
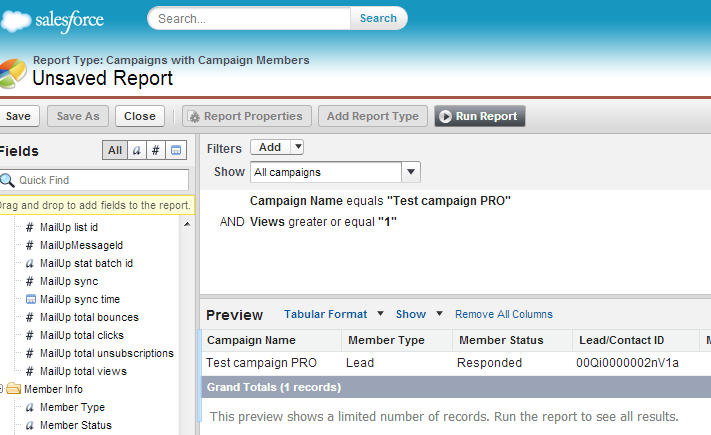
La possibilità di fare report all’interno di Salesforce relativamente ai dati di un campaign member permette di selezionare ad esempio quei contatti interessati a una certa campagna (che hanno visto l’email o che ci hanno cliccato) e poi mandare loro un messaggio di follow up.
Esempio di report:
...
Imports campaign statistics from MailUp to Salesforce | |
Create message from template | Creates a new message in MailUp using custom templates created with the WYSIWYG HTML editor. This is needed to associate the message in MailUp with the Campaign in Salesforce. You will edit and send the messages from MailUp so that you can leverage all of its features. A note will automatically be added to the message similar to the following "<MESSAGE ID> - Message generated from Salesforce campaign <CAMPAIGN ID> <DATE DD/MM/YYYY TIME>" |
Create empty message | Creates a new, empty message in MailUp (i.e. a message not generated from a template). This is needed to associate the ID of the message in MailUp with the Campaign in Salesforce. You will edit and send the messages from MailUp so that you can leverage all of its features. Choose this option if you want to create the message from scratch using the WYSIWYG HTML editor in MailUp, or if you want to copy and paste your own HTML. A note will automatically be added to the message similar to the following "<MESSAGE ID> - Message generated from Salesforce campaign <CAMPAIGN ID> <DATE DD/MM/YYYY TIME>" |
Refresh message preview | Allows you to see the latest version of the message, retrieved from MailUp, without having to log into your MailUp account. This is useful if - down the road - you want to see what email message was associated with this Campaign. |
View report | Allows you to view campaign statistics directly in Salesforce, without having to log into your MailUp account. (These statistics are not the same as the statistics that get imported into Salesforce. These are higher level statistics and are static.) For even more high-level campaign statistics, log into your MailUp account and visit the Statistics section in the navigation. |
What happens after exporting to MailUp
Now log into your MailUp account.
Under Recipients > Groups you will find a new Group of recipients with the name of the campaign. Note: if a recipient already existed in MailUp prior to this campaign:
The recipient will be assigned to this new Group. The recipient remains assigned to any other group it had already been assigned to
The recipient's profile will be updated with the latest information coming from Salesforce. This applies to the data contained in the fields that have been mapped between Salesforce and MailUp in the configuration.
Under Messages > Email > Saved you will find the message that you have associated with this Campaign after creating the empty message from Salesforce (see Create empty message or Create message from template in the table above)
Create a new message
Ready to create a new message? First, you must create a message in Salesforce which links to MailUp: in Salesforce on your campaign page, choose if you want to use a MailUp design (Create message from Template) or prefer an empty message (Create Empty message.)
As mentioned above, this step is needed to associate the message that will be sent from MailUp with the Campaign that has been created in Salesforce.

Now, to find the message in MailUp, log into your MailUp account and go to your saved emails:
The message is named after the Salesforce Campaign
Campaign details are saved to the message Notes.
The message is not edited and/or sent from Salesforce, but rather must be sent directly from MailUp. This is because MailUp contains all the advanced features that you need to create, test, and execute a professional email marketing campaign.
Modify your message and see the changes in Salesforce
Whenever you change the message in your MailUp console you will be able to see it in Salesforce by clicking Refresh message preview, or simply by refreshing your browser.
This ensures that you are always one click away from seeing exactly the content that has been sent (or will be sent) to your campaign members.

Send your message from MailUp
If you are ready to go, send the message from MailUp and select your previously created Group in the Select recipients page.
| Warning |
|---|
WarningRemember to always change your message's subject. Keep your notes as they are and you will be able to always reference your message back to your Salesforce campaign. |
Sync your statistics
After sending the message, you should easily import your statistics in Salesforce with the button Import statistics in Salesforce and you will be able to see the data in the campaign page in the MailUp section:

And in the campaign members details page:

If a user unsubscribes in MailUp, the Email Opt-out field in your contact or lead page will be automatically checked.
Statistics can be updated on demand with the Import Statistics function or by scheduling the statistic synchronization (See Schedule Task).
| Note |
|---|
Please note that the scheduled synchronization will only update statistics for active campaigns with Start Date within the number of days set in MailUp Configuration. If you want to update stats for an older campaign, you need to update them on demand with the Import Statistics feature. |
Check your results
After sending your email, you will notice a new button View report in the MailUp section of your campaign
| Note |
|---|
The pop-up may be empty because your browser is preventing a script from running. Just authorize the script to see the statistics. |

Leverage your data
The data that you imported are visible in each campaign member field and can be used to run a report in Salesforce and to create further campaigns.
| Tip |
|---|
TipSome example of campaigns:
|
