Download your plugin from the following URL: https://login.salesforce.com/packaging/installPackage.apexp?p0=04ti0000000AlPi (version 1.23)
Info
If you are testing the package in a Salesfore sandbox organization, change the first part of the URL to http://test.salesforce.com
In the Package components page your will notice several information on which pieces will be added to your org, you can simply click on Continue.

Next: please authorize the communication between your MailUp console and Salesforce by selecting the appropriate checkbox and clicking on Continue.
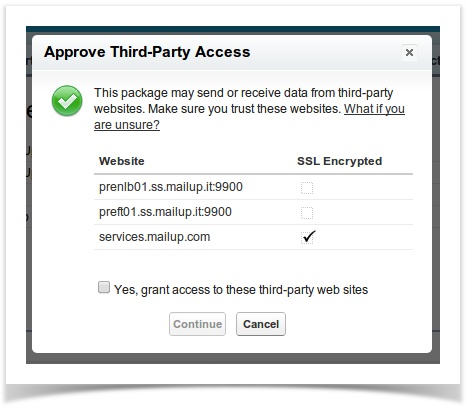
You will then see a summary of the API access requirements for this package. Just click on Next to proceed.

You can then define the access levels for your different users' roles, select the desired granted level and click on Continue.

You have finally completed your configuration and can now click on Install.

And your MaiUp connector is ready to go and will be available amongst your installed packages:

Field configuration in your Salesforce layouts
To use your connector you will need some further configurations to happen.
1) Select your Campaign layout and add the MailUp button (already available in your fields and buttons lists):

2) Create a new section in your Campaign PageLayout, named MailUp, and include the following fields:
- MailUp total views
- MailUp total clicks
- MailUp total bounces
- MailUp total unsubscription

3) Create a similar section in your CampaignMember PageLayout:
- Views
- Clicks
- Bounced
- Unsubscribed

Console and fields mapping
Map your MailUp console with your Salesforce organization from the new tab Configuration.
Add the follwing data, click on Save and then on Activate console:
ConsoleID: unique identifier of your console, usually it is a combination of 5 numbers (e.g: 12345)
Username della console MailUp: userID, usually it has the same number combination of your consoleID and the letter m in front of it (e.g: m12345)
Password della console MailUp: your MailUp password
Endpoint URL: the MailUp console URL (e.g.: http://b0x5a.s42.it )

Warning
You can only associate 1 MailUp console with your Salesforce organization and this will be linked with 1 List only.
Any group or message that will be imported from Salesforce to your MailUp console will be available in the appropriate area of this list.
You will notice that the page where you just confirmed your console association will now show a new section: Schedule task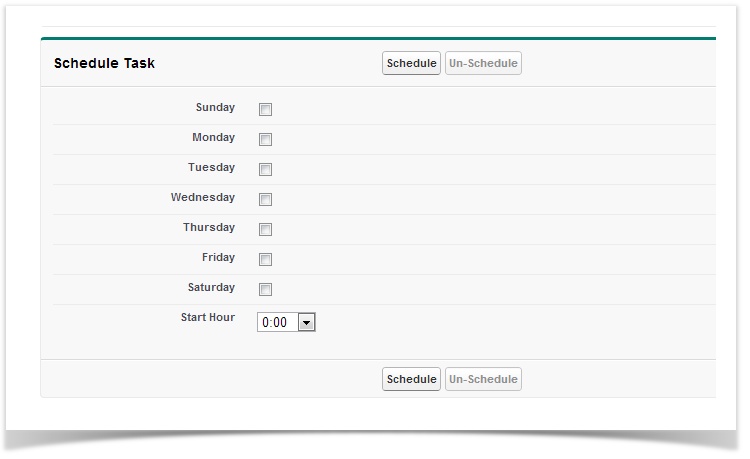
This section si meant to allow you to schedule a synchronization of your campaign statistic. These statistics will be retrieved, once a day at the time you prefer, for a month after you sent your message.

Let's associate your Salesforce contacts' and leads' fields with your Recipient fields included in MailUp, through the new tab Field Mapping.
Warning

You can start your first campaign now!