Published — v. 3
/
Excel
Excel
Setting up the MS Excel file for importing
Before importing into MailUp, be sure to configure your Excel file to have:
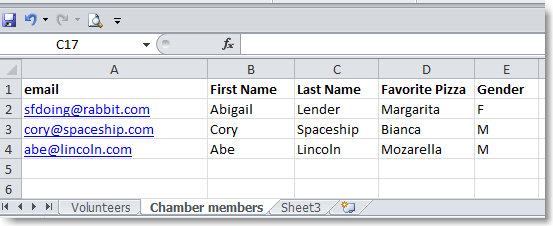
- All the data in one worksheet (one single sheet). MailUp will automatically import the worksheet based on alphabetic order (not according to the sequence in the file. For example, if you have two worksheets in your file, the first named Volunteers and the second named Committee Members, MailUp will choose the worksheet named Committee Members.) To rename the worksheet, right click on it and select "Rename."
- The first row of your worksheet can have any value, such as the names of each column. How you order your columns in Excel is not important for the import. As we will see, during the import you can choose not to import the first row.
- Excel file not to exceed 10MB. If the Excel file that you are trying to import is bigger than 10 MB, the system may not be able to process it via the Web-based import procedure. In this case, consider reducing the file size by deleting any columns or data not strictly necessary for your email marketing campaigns. If you need to import a vast amount of data, you may choose instead an FTP-based import method.
Other suggestions to properly set up your MS Excel file before importing:
- Remove all worksheets except the one that you are importing
- Empty rows can create a problem. A quick way to remove them is to simply sort the records. To do so, select all rows by clicking on the top-left tile in the worksheet and by pressing the A-Z sorting button in the Data toolbar.
- It’s a good idea to remove all formatting before importing an Excel spreadsheet (e.g. in the screenshot above, there are some email links that should be removed). To do so, select all rows by clicking in the top-left tile and then select “Home > Clear > Clear Formats”
- If your worksheet contains a lot of columns, and there are columns that you do not need to import, remove them
- File name doesn't have to contain space or special characters
Importing the Excel file in MailUp
In your MailUp platform, go to Recipients > Import and click on the "XLS" format icon. This method supports both past versions of Excel 97-2003 (i.e. .xls files) and current Excel versions 2007 and 2010 (i.e .xlsx files). Next, follow these steps:
- Click on the browse button to locate your Excel file and click on Upload. You should see that your file has been selected.
- Choose to assign the list of contacts from your Excel file into an existing Group in MailUp or create a new Group.
- Click on the "Next" button to continue.
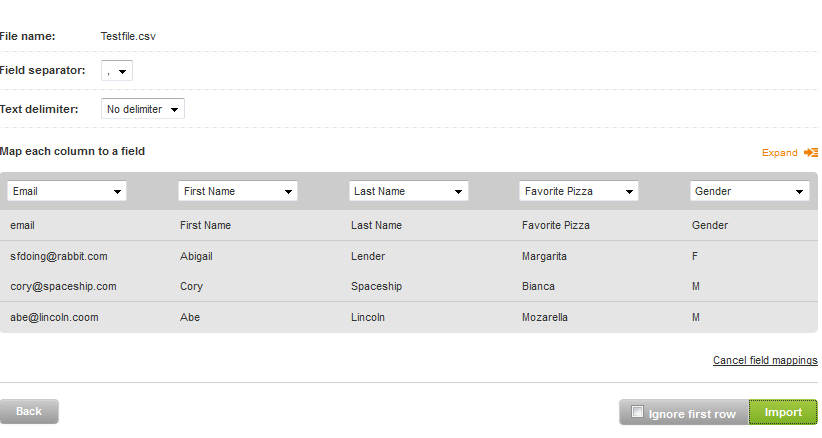
- Now, you can map the columns of your Excel file to match the MailUp fields. You must match the fields in order for the data to be imported correctly. For example, the first column in my Excel file has email addresses, so I need to choose from the drop down tab Email.
- Continue mapping all your columns and once you are done click on Import, and in this case also select Ignore First Row.
- Be sure to follow the last step. Once you see your file in the Import queue, press Start Importing.
The system will import your Excel file and show you the status of the import.
You should then see this once the import has started:
For large Excel files, the import process may take a few minutes. During this time, you can perform any other task and even log-out. The import process will continue until completed!
, multiple selections available,


